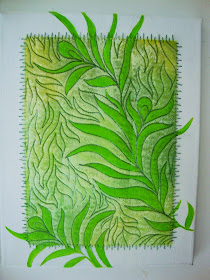
I started off with a piece of hand dyed lime green fabric, which I free motion quilted...you can see somewhat of a plant/floral design in the quilting. Look hard! It's there...ha I also use a darker shade of green so it will stand out.
Next, I took a gallery canvas (from JoAnn's) and painted Gesso over the entire front. This is just a precaution...as you'll see later on the process. Let the Gesso dry then we're onto the next step!
Now, cut to size your quilted piece keeping in mind you need to keep at least an inch border of the canvas. You need this space to be able to sew through to the other side to attach your quilt.
Glue the cut quilted piece onto the canvas and then stitch through the edges to attach. I used 12wt Sulky thread to attach, just because that was the color of green I wanted.
Next up, and this can be the scary part!!....you take acrylic paint and using a brayer, roll paint over the entire quilted piece...even onto your sewn edge thread.
Once your piece is dry then the real fun begins...you start painting in areas with the original color of your piece. In my case, the original piece was more of a dark lime green. I just happened to have on hand some lime paint. I actually love this part...it's very relaxing to just paint!!
You can see the part(s) that I'm now painting.
Next, I want some of the leaves to fall onto the canvas so I take a pencil and draw the placement I want. This does take some time and I find myself erasing a lot until I get what I want.
If you find your pencil marks are causing some dark spots, just paint over those areas with Gesso. And...if you find your painted marks aren't excact you can use Gesso to cover your painted area or to clean up an area. Gotta love Gesso!!!
Just another picture of the edge...actually, this picture should be turned! This is the lower left edge on my piece!
So that's the process...that's my challenge piece!!! I do love attaching pieces of quilts to canvas.
I have made several of these and enjoy the process...here are a few more that I've made.
 |
| This was for a fiber group challenge. |
 |
| This was a wedding gift for my great niece. It was a picture I traced from her wedding invitation. |
 |
| This was the very first one I did. Lots of fun!!! |


Love this process...a must try for me. Very nice.
ReplyDeleteyes! I definitely want to try this! Lovely piece, Robbie, Thanx for the inspiration!
ReplyDeleteGreat technique, must give it a go sometime. Love your colours and design too!
ReplyDeleteInteresting approach to your art quilt. I am a huge fan of yellow green and love all the leaf motifs. Another great piece Robbie!!
ReplyDeleteSomething else on my "to do" list.
ReplyDeleteThanks for the step by step Robbie.
Great work.
Wonderful quilt Robbie. I love everything about it from the stitching to painting, stitching onto the canvas as well as the overflow onto the canvas. Thanks for explaining the process.
ReplyDeleteA great quilt and love the process of getting there. A project for the future.
ReplyDeleteAnother new technique to learn!! You guys are so inspiring!!!
ReplyDeleteI love the free flowing movement in this piece, Thanks for the explanation on how you made this.
ReplyDelete